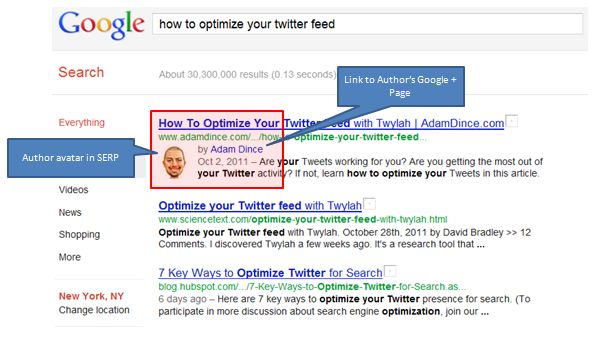
Wanting to claim your articles and posts as your own with Google Authorship? There are many ways you can claim your articles as yours with Google Authorship. This will add your image and links to more of your posts to the left of the articles that appear in the Google Search Engine results.
There should be no misunderstanding at this point that "Quality Content is King" with Google. If you are an active blogger and/or write informative, unique, authoritative articles, you should make sure Google is giving you credit for your articles as being yours by setting up your Google Authorship!
 There are several other benefits of having Google giving you authority for your articles:
- Link to your Google+ page: On your Google results page where you appear for your search results, Google will automatically add a link to your personal Google+ page!
- Personal Image: Google will automatically add the image you have used on your Google+ profile to the left of your result.
- More Articles by this author: Google will also add a link to more related articles that you have written.
In order to claim your Google Authorship for your articles, there are a few steps that you should go through to ensure that you have your Google Authorship set up correctly.
Steps to Ensure Google Authorship
1) If you do not have a Google+ account already, you must create one.
2) Use a clear profile photo with a recognizable headshot as your Google+ profile image
3) In your Google+ account, be sure you have a link to your Blog. (edit profile->contributor to->add URL to your blog)
4) Make sure that in your WordPress profile settings that you have the same email in your profile that you have used to set up you Google+ account.
5) Verify with Google Authorship.
6) You must have the <link rel="author" href="https://Google+Account"/> in your page source. To make this very simple, add the "Social Author Bio" to your blog.
After installing, complete the profile settings. This will ask for a link to your Google+ page and once complete will add the rel="author" tag automatically to the posts you choose to add your Bio to.
7) Be patient. Allow Google a little time to do its thing and connect your accounts. Then test any URL with Google's "Structured Data Testing Tool". If set up correctly, you should now see your Google Authorship as being successful!


I started using this and it works great. Very easy to setup.